Showing posts with label how to paint. Show all posts

Friday, 14 February 2025

My Lamenters two-step-yellow recipe

For the last 18 months I've found myself painting Lamenters. I often get asked about my yellow technique, so I made a little tutorial.

Phobos Infiltrators

Preparation

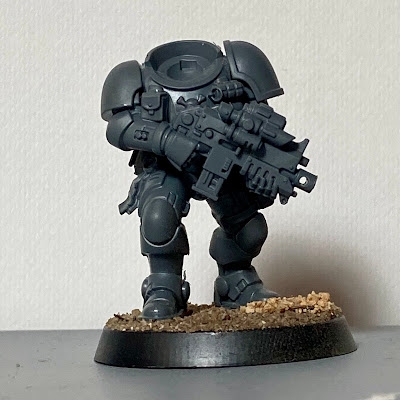
i. Remove moldlines and assemble. I glue sand etc. to the base now. I prepare and paint the backpack and head separately. 

ii. Undercoat Vallejo Bonewhite rattlecan.

iii. Paint the base.

iv. Drybrush white. I've found this subtle slapchop works well for me.

Okay, here's the real meat.

1. Contrast Ironjawz Yellow

2. SMS Umber Wash. This is an oil-based product by an Australian model paint company. I work it into all the creases...

3. ... then I clean it up with Artists White Spirit and a makeup sponge. I get rid of the worst excesses (e.g. back of the hand, shoulder pad) but it doesn't have to be pristine. That's it! Your yellow is done. No highlighting required.

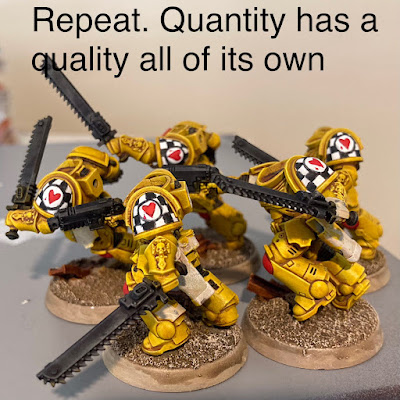
4. Paint the rest of the Lamenter. The left pauldron (chequered) is hand-painted (previous tutorial); the tactical symbol on the right is a decal.

I appreciate an Australian oil wash paint is a bit niche, but I'm sure a similar product exists elsewhere. The point is that I've found a reproducible way for me to get masses of yellow done without losing my mind with edge-highlighting. I've seen nice things done with pink pre-shading, but I'm committed to this technique now. It doesn't have to be too neat; the rest of the details hide major flaws in the yellow. These figures won't win individual prizes but they're done.


Friday, 11 October 2024

How I paint Lamenter icons

 The Lamenters have a famously challenging chapter badge. Here's why I find it challenging:

  • straight, parallel lines
  • right angles
  • symmetry
  • perfect circle
  • perfect squares
  • painted on a curved surface
Each of these is its own challenge, and your brain will subconsciously identify irregularities and imperfections quite easily.

From @brushandboltgun

There are alternatives to freehand painting- transfers and 3D prints exist, but are not usable for every model. So here's how I approach mine. I use a #1 brush for every part of this process.

Key points:
  • Perfection is the enemy of good enough
  • Thin paints, careful strokes
  • The en masse effect of several models will override any individual flaws.
I do this somewhere in the middle of the painting process- after the yellow but before the final details. I start with two thin coats of white.


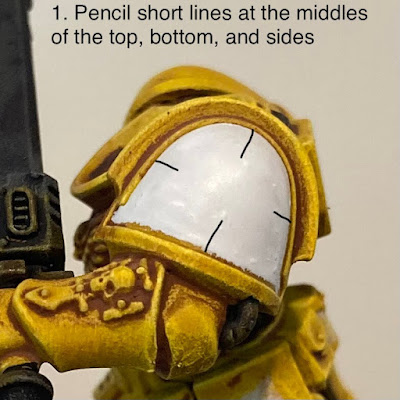
I then use a pencil to plan the checks. I've tried a few different approaches- this is my current preferred approach. I've demonstrated this with a diagram, the actual pictures follow.


Here's how it actually looks at this stage:


Now you've pencilled in the pattern, carefully fill it with black. I use Army Painter SpeedPaint 2.0 Grim Black. Work hard at getting right angles and parallel lines.


Here's an actual model:


You'll tidy this up later. Now it's time for the heart. This is challenging due to the symmetry and the need to replicate a familar symbol dozens of times. I use Army Painter SpeedPaint 2.0 Slaughter Red, then Vallejo Vermilion.


Here are actual process pictures of the heart stage.


After this, I tidy up with white and black to get rid of irregularities and pencil lines. Done! I usually do about five of these at a time. The group effect at arm's length is quite satisfying and buries a lot of little flaws.


Practice makes perfect!


Next time: can I get these finished?

Friday, 7 October 2022

How I painted liquid hot magma

I 3D printed some vats from Stellarscapes (PLA Ender 3 0.12mm). They had a textured content, which I wanted to paint like molten metal. I thought I would paint it fiery colours on a white undercoat, then drybrush black over the top for a magma-through-the-cracks effect like my balrogs.

I started with a white Vallejo primer, then used Army Painter Speedpaints. I used the dropper bottles for a few drops of Fire Giant Orange and Blood Red onto a still wet Zealot Yellow base. The colours bled into each other in a very satisfying tie-dye fashion, and I let them dry. I was so happy with the effect I decided not to add a dark drybrush layer.

Texture is nicely visible

Zealot Yellow

Five drops of Fire Giant Orange

Two drops of Blood Red
It spreads out more and lightens as it dries

Ready for last week's battle

The texture helps the effect. You could probably get some cool effects with other colour combos- greens and blues for examples.

I had these sitting on the kitchen bench. The Skirt Swisher came past and did a double take of amazement and disappointment when she realised I had not, in fact, whipped up some crème brûlées.

Monday, 14 January 2019

15mm WW1 French tanks

From my previous post showing comparisons and how I did conversions, these are the PSC Schneider CA1 and Saint Chamond, and the two Battlefront Schneider CA1s. I made up the camouflage based on other schemes, and am happy with the appearance. The colours were:

  • Army Painter Ash Grey
  • Vallejo Model Color 394 Russian Green
  • Vallejo Model Color 984 Flat Brown
  • Vallejo Game Color 72.097 Pale Yellow
  • black
Then Army Painter Strong Tone wash and drybrush Vallejo Model Color 70884 Stone Grey, and add mud! (Vallejo Dark Earth paste drybrushed Vallejo US Tan)

PSC Schneider CA1 and Saint Chamond

PSC Schneider CA1

PSC Saint Chamond

Schneider CA1s: PSC on left, Battlefront centre and right.

Schneider CA1s: PSC on left, Battlefront on right
You can't really tell the Schneiders apart at a glance, I need to compare the rivets and MGs.

I'll put up my French infantry at the end of the week.

Friday, 7 December 2018

An important spray undercoat accessory, reforged

A few years ago I made Excalibur out of balsa wood and magnetic tape. She was used to hold washer-based figures for prepping with spray undercoat in a rotisserie style, as it really helps the spray reach all the nooks and crannies.


Unfortunately, I broke her by ill-advisedly using her to beat the dust out of a carpet...

With the Analogue Challenge IX approaching, I'm in full prep mode again (I hate prepping). I visited my local hardware store and got some self-adhesive magnetic tape and a metre of wood. I also got a steel post for use with figures with magnets under their bases.

I thus present Narsil and Andúril!
Andúril and Narsil

Narsil and Andúril

I've kept the tape central on Narsil, so that I can hold it at either end and get the spray where I need it.

Cue goosebumps:

Monday, 13 October 2014

Five Armies: Free Peoples

Here's how I painted the Free Peoples from The Battle of Five Armies, after prepping them as per my earlier post.

I don't have a step-by-step guide to the characters, but I used the same paints and similar principles, albeit with a little more care and a few more highlights and fancy touches like Thranduil's gemstone.

Bard and the Lake-Men

Lake-Men
  1. Blue-grey to leggings and sleeves
  2. Mid-blue to jerkin, boots, gloves
  3. Dark blue to belts, scabbard, quiver
  4. Metal to buckles, sword hilts. Pale grey to boot fur and arrow fletchings
  5. Black wash
  6. When dry, pick out the face with flesh, and add a light blue headband. I painted the wrappings on his quiver with the same colour (not shown)
Bard
I painted Bard using the same colours, but in a more 'traditional' style with shading and highlighting. I gave a faint blue wash to his metalwork.

Elves and Thranduil

Elven Archers
  1. Pale green to leggings, sleeves
  2. Bright green to the jerkin (it's the same colour I used for the Orcs)
  3. Dark green details. Flesh to the face. Brown to the straps
  4. Gold buckle. Cream hair, bow.
  5. Sepia wash
Elven Spearmen
  1. Flesh to skin. Silver armour and spearpoint
  2. Dark green cloak
  3. Bright green to the overgarment
  4. Gold clasps and helmet detail. Cream spear
  5. Sepia wash
Thranduil

Thranduil was painted with the same greens. I painted his armour gold, then drybrushed it silver. I then painted the greens and washed the figure in sepia. Then I picked out the high points on the cloak and gown with lighter greens as highlights. I indulged myself with the gemstone.

Dwarves, Thorin, & Dáin

Dwarf Regulars
  1. Red to the jerkin
  2. Dark grey to boots, gloves, belt
  3. Metal to the hammer and helm
  4. Gold to the buckle and studs (gloves and jerkin)
  5. Black wash
  1. Dwarf Veterans
  1. Grey rock. Metal to the mail, armour and axe
  2. Red to the gloves, boots, belt and scabbard
  3. Black wash
  4. Gold to the helmet and swordhilt, flesh to the nose
  5. Controlled sepia wash to the gold and nose (optional step)

Thorin

Dáin
Thorin and Dáin were painted with the same colours I used for the other dwarves. I spent a fraction more time on the skin. The weapon hafts and Thorin's beard are dark grey.

Great Eagles
  1. Umber wash
  2. Sandy colour to the face/ head
  3. Yellow to the beak, claws
The Lord of the Eagles
I gave the Lord of the Eagles a black wash after the umber wash, and used cream rather than sand for his head. He stands out a little from his companions, but not much.

Gandalf, Beorn and Bilbo
Gandalf
Gandalf was painted dark grey, had a black wash, and was then built back up with lighter greys to the ridges on his clothes. I painted his beard a light grey, gave it a thin black wash, and picked out a few bits in light grey again. The iconic hat was painted blue-grey and highlighted with a thin pale grey. I'm really happy with his sword, Glamdring. There's a subtle change from a dirty metal to shining silver.
Beorn
Beorn was easy to paint. He was drybrushed all over in cream, then heavily washed in umber and black. I painted the claws black and gave them a thin light grey stripe. The eyes were painted black, with a teeny dot of white.
Bilbo Baggins
Bilbo was painted with dark brown trousers and a khaki shirt, highlighted with a mid-brown and cream respectively. His skin (like Gandalf, Bard, and the dwarf characters) was painted red-brown and then the raised areas picked out with flesh.

That's it! This project only took me a couple of dedicated (but intense) evenings.

Feedback and questions will be gladly answered.

PS- can't help myself:
A thief, two thugs, an assassin, and a maniac. Oooga chuga ooga chuga...