Friday, 27 September 2013

Zulu! Rorke's Drift

If twelve hundred men couldn't hold a defensive position this morning, what chance have we with one hundred?
Lt Bromhead, Zulu

The news of the disaster at Isandlwana has spread to the British force at the Rorke's Drift mission station. Sentries are pulled back in after they report the Zulus are coming...

As per Bayernkini's scenario, the British (forty men plus two officers) have to fight off three attack waves. A wave is fought off if four Zulu elements are destroyed. The Zulus then completely reset, while the British may return some casualties, and arrange their remaining forces as they see fit.

Scenario map showing deployment
Rorke's Drift mission station.
Hospital in the foreground, redoubt and storehouse in the distance

The First Wave


The Zulus rapidly assault Chard's men by the hospital.
By the redoubt, a weaker Zulu force is held off from the wall.
The force in the hospital takes many casualties, but fights off the wave.
In the first wave, the main assault comes at the hospital end, but is countered. The British take thirteen casualties, but recover three, leaving thirty (plus the officers) to defend the station. They are then redistributed between the hospital end, under Chard, and the storehouse end, under Bromhead.

The Second Wave

British disposition for the second attack.

The Zulus rush the centre.
The Zulu leader, in a captured jacket, faces off against Gonville Bromhead.
Bromhead withdraws to the redoubt...
... and has to abandon it to the Zulus!
Things are looking grim as the British are forced into the courtyard...
...but Bromhead and Chard are just able to repulse this wave.
After the first wave, the British were cautiously optimistic. But the Zulus launched a rapid and massive assault that tore apart the defenders by the redoubt. Bromhead barely escaped, and the British were just able to destroy the necessary four elements and prevent being torn apart themselves. The British took a devastating twenty-five casualties, and only recovered one, leaving just six redcoats and the two officers to try and survive the third wave.

The Third and Final Wave


The remaining British prepare their last stand by the redoubt.
The Zulus come straight at them.
Chard desperately tries to pick off stragglers as Bromhead retreats into the redoubt.
The last defenders of Rorke's Drift, immediately before their deaths.

This wave was never going to be easy. The Zulus didn't take their time to build up an unstoppable force, however, and charged straight for the British. The British were only one kill away from taking out a third element, and only needed to take out four elements to survive... but not today.

Chard and Bromhead meet their downfall in the redoubt
This game was a great last stand. The British held off the first wave fairly comfortably, but got ripped apart by the second. I didn't think they were going to make it, but eked out some kills to survive into the third wave. They only had two understrength units left, and I almost didn't play the third wave as the conclusion was certain, but the British surprised me with accurate shooting, taking out two elements and having a third down to only one man. But the Zulus were too many, and the fall of Rorke's Drift becomes a minor footnote to the Battle of Isandlwana.


The defence of Rorke's Drift 1879, by de Neuville. Somehow, this has been at the Art Gallery of New South Wales since 1882.

Next: Scenario rules, variants and ideas

Friday, 20 September 2013

Zulu! Isandlwana


I can see it still, the great jagged rock of the 'Little House' rearing up above the stony, sun-baked African plain, the scattered lines of our red-coated infantry, joking and cat-calling among themselves as they waited for the ammunition that never came; the red-capped Natal Kaffirs scurrying back to take their position on the rocky slope; a black-tunicked rider of Frontier Horse leaping the gun limbers bellowing a fatuous order to laager the wagons, which went unheeded and was too late by hours; Pulleine fumbling with his field glasses and shouting hoarsely: "Is that a rider from Lord Chelmsford?"; a colour-sergeant frantically hammering at the lid of an ammunition box; the puffs of smoke from our advanced line firing steadily at the Zulu skirmishers; the rattle of musketry over the ridge to the left; the distant figures of Durnford's men on the right flank falling back, firing as they came; a voice croaking: "Oh, dear God Almighty!"- and it was mine, as I looked nor'east over the ranks of the 24th, and saw the skyline begin to move, like a brown blanket stirred by something beneath it, and then all along the crest there was the rippling, twinkling flash of thousands of spear-points, and a limitless line of white and coloured shields with nodding plumes behind them, rank after rank, and down the forward slope came the black spilling tide of Ketshwayo's impis, twenty thousand savages rolling towards our pitiful position with its far-stretched line of defenders.

Say what you will about General Sir Harry Flashman V.C., he knew how to write.

The dry Nyogane donga separates the adversaries

N Battery anchors the British centre, next to Pulleine and the Colours.

Situation at the start of the battle.
The initial hammer blow comes from the Zulu right horn...

... but is repulsed for the loss of a unit.

The left horn attacks Zikhali's Horse and the neighbouring infantry.

The Zulu main body assaults through the donga...

...and swarms through a hole in the British line!

The British centre crumbles.

The Colours and the gunners make their last stand as the flanks collapse back.

Pulleine stands alone. The remnants of the British force prepare to die.
Battle of Isandlwana, 22 January 1879 by Charles Fripp.
What a cracker of a game! An initial strong Zulu assault on the British left was repulsed, but then a strong 'Forced March' brought overwhelming numbers into the centre. That was the decisive moment of the battle. The British right then collapsed, and the remnants of the centre and left were ground down. Durnford and the NNH were the last to die, at the foot of Isandlwana.

The basic scenario is as per Bayernkini. I added the following 'solo' rules to fight two AIs against one another:
  • Zulus draw two cards each turn and play the most favourable, discard the other.
  • British roll a D6: on a 6 they only draw one card, otherwise play as per the Zulus (this represents the British having a Command of 5 compared to the Zulu's 6)
  • Remove Fightback from the deck

Next time: Rorke's Drift!

Acknowledgements:

First picture
Last picture
See Fripp's painting at the National Army Museum

Thursday, 12 September 2013

Zulu! Natal Native Horse and Artillery


Natal Native Horse


HäT Natal Native Horse. More accurately the Natal Native Mounted Contingent (NNMC). I only needed three of these for Bayernkini’s Isandlwana scenario. I may do the rest, including dismounts, later. I quite like these guys, they really look like frontier scout militia. They're not quite as 'yellow' as the picture makes them appear. The horses' basecoats came out patchier than I intended, and I fixed that up for Colonel Durnford.


NNH. Some were part of a unit known as Zikhali's (or Sikhali's) Horse.
Before sepia wash.
NNH in Zulu Dawn.

Artillery


This is a 9 pounder RML (Rifled Muzzle Loading) gun, also from HäT. Again, I only need three figures. I mounted the gun on a piece of plasticard, because I didn't have any spare 30mm washers. The actual cannons at Isandlwana (there were only two) were the less impressive 7 prs.

N Battery, 5th Brigade
Before sepia wash
9 pr in Zulu Dawn
7 pr
Next time: Isandlwana!

Friday, 6 September 2013

Zulu! British Officers

Before getting into the officers, here are the Other Ranks before sepia wash:

Bromhead & Chard

I decided to go more for a film aesthetic than true historical. These are from the HäT British Command set, with some headswaps to replace beards and moustaches. These were painted the same as my redcoats. Note that Chard has black and gold embellishments, suitable for the Royal Engineers. As you can see on the pre-wash pictures, I block painted their helmets white, but the end result wasn't as obvious compared to the Other Ranks as I expected.

Bromhead & Chard

Before sepia wash
Stanley Baker as Chard, and introducing Michael Caine as Bromhead

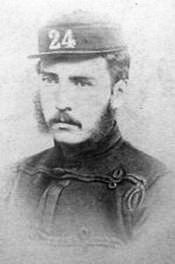
Gonville Bromhead, Lieutenant, B Company, 2/24th (2nd Warwickshire) Regiment of Foot

John Chard, Lieutenant, Royal Engineers, Officer Commanding Rorke's Drift.

Durnford

I did a headswap for Durnford, and am quite pleased with the outcome. Doesn't have the impressive mo' or hat feathers, though.
Durnford

Before sepia wash

Anthony Durnford
Burt Lancaster as Colonel Durnford in Zulu Dawn

Pulleine

Pulleine looks rather stiff. Using the same base figure, I painted a Queen's Colour to go with him, just because. I was pleasantly surprised with the final effect on the flag, it's nicer than I anticipated.

Pulleine and Queen's Colour

Before sepia wash
Henry Pulleine
Denholm Elliott as Colonel Pulleine in Zulu Dawn
Next time: Natal Native Horse and N Battery

Friday, 30 August 2013

Balin

Painted for the August 2013 One Ring challenge. He's painted to match my existing dwarves.

Balin, son of Fundin, Lord of Moria.


Don't worry; my Zulu project will be back soon!

Sunday, 25 August 2013

More Blood Bowl Dwarves

As part of the B9 Tourney swag, we received three dwarves- two from Stonehaven, and one Shadowforge. I picked them up at Eucalyptus Bowl in July, and was able to paint them before the B9 event. I wasn't initially sure how to paint all of them.

The first (from Stonehaven) was easy- he became a straightforward barman, and nicely complements my existing barmaid (from Four A).
White wine spritzer?

Because Dwarf teams need Bloodweiser Babes- right?

I had a flash of inspiration when I realised that the next figure (also Stonehaven) reminded me of Derek Zoolander!
Ridiculously good-looking

And so the Blue Steelers were conceived. I've already got a dwarf team, the Kneecappers, but now I could get a Shadowforge one... The miner could be Grim Ironjaw, or Flint Churnblade. I went for astrogranite basing, which is dull but would complement the team's mining backstory.
Clearly she shaved her beard

At the B9 tourney itself, the organiser (Babs) set up a speed painting contest if we finished our games early. I couldn't resist, and this is my finished result:
I'm quite stoked with this. She was new in her blister, and after my first match I cleaned off flash, epoxy-ed her to her base, and slapped on a coat of Skull White. After my second match, I swiftly and neatly painted the skin, clothes, hair, and flocked the base- in about 40 minutes! (no glue to the base, just Goblin Green and dunk in flock!) After the third venue, I added a few shades and highlights over 10-15 minutes, but most of the work had been done. I smugly received the Speed Demon award for this effort, but admittedly the only other entrant was Babs and he partially disqualified himself by being the organiser and not playing all the matches. Yay me!